{my desk after a morning of work}

A few months ago my friend Carey came over for dinner. Carey and I have been friends since college and I was excited for her to see my new apartment. As with all dinner parties, I like to make sure my home is clean and tidy before guests arrive. I am a full on neat freak so I’ll be the first to admit I probably go to greater lengths than most people to get things prepared, but it’s important to me.

After we had poured some wine and I’d given Carey the little tour, she turned around and said “Ok, there has to be some disaster of a closet around here or something??” I had to laugh. Yes, I had made the extra effort to clean but I didn’t expect that reaction! While I’m proud of my home, it’s far from perfect 100% of the time. I know you haven’t seen my home (well maybe some of you have), and I really have nothing to prove, but sometimes I think a blogging reality check is in order.

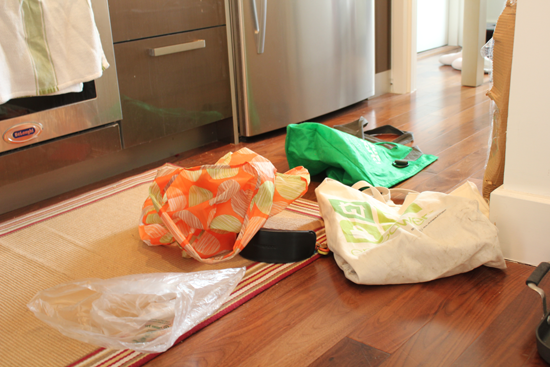
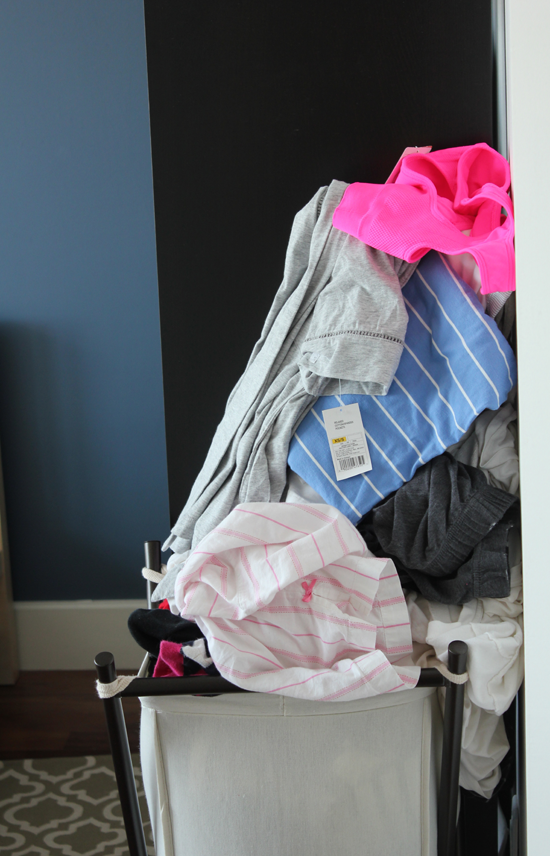
I love blogging, and I love reading other people’s blogs, but at times seeing all the pictures of people’s picture perfect homes, gorgeous dishes, beautiful outfits etc etc makes me think- is this real life? I didn’t really plan on writing a post like this, but as I was walking around my apartment this past Sunday, and I noticed the utter state of chaos we were living in, I had an idea. And then I snapped a few photos, so you could all see me in my real life glory. So here it is! Our everyday lived in home. Take a peak, marvel at my laundry pile, and hopefully you can breathe a little easier about your laundry pile or whatever is irking you about your home!

{the kitchen floor after unloading all our groceries}

{laundry pile-and yes I cut that tag before I washed these clothes!}

{my kitchen counter’s normal appearance}

{what our bedroom really looks like}

Hello! How was your weekend? Mine was more of a working weekend, but it felt so good to get some major things crossed off my to do list. We’re talking major things. Things that had been sitting on their since, oh…. last April (don’t tell my car insurance company that). Outside of that there was a lot of life stuff.  Life stuff like bathroom cleaning, closet organizing, grocery shopping, and a trip to Target. It also was a really good food weekend. There were blueberry buttermilk pancakes (thanks, Mom!), a brie, pear, and arugula sandwich, cardamom creme brulée, pork belly udon, lentil and sausage soup (recipe coming this week!), and these babies. I have always been a lover of rice crispy treats, but these are truly special. The brown butter and sea salt makes all the difference, and I can’t possibly imagine making them any other way now that I’ve had this version.  Let’s just say we’ve already made it through half the pan- we’ll be lucky if these treats last us through Tuesday!

Hope your week is off to fabulous start!

Salted Brown Butter Crispy Treats slightly adapted from Smitten Kitchen
Makes 12 good size bars

  • 6 cups rice cereal
  • 6 T unsalted butter
  • 1 bag marshmallows
  • 1/4 tsp sea salt

Grease an 8×8 inch square pan and set aside.

In heavy bottomed pot, melt the butter and salt over medium low heat.  Watch it closely as it melts, scraping any brown bits off the bottom of the pan.  Once the butter reaches a nutty color, pour in the marshmallows and stir to combine. With the heat on low, let the marshmallows melt, stirring occasionally to combine with the melted butter.  Once you have a smooth mixture, turn off the heat, pour in the cereal, and stir well to combine. Pour the mixture into the prepared baking dish. Grease your hands lightly with vegetable oil, and press the mixture into the pan. Let rest at room temp for one hour before cutting and serving.

Confession: I loved me some Oprah in high school. My after school routine often included fixing myself a massive bowl of cereal and then plopping myself on the couch with my snacks and homework and tuning into ABC at 4 pm. Think what you will, but I was totally into her show!

Nowadays, Oprah is not such a staple in my life.  Due to the fact that we don’t have cable, and well, my work schedule is not the same as my school schedule, I barely ever watch it (and maybe it’s already ended for good?). But from time to time, I catch a really good article in her magazine.  Most recently, “How to Find the Kind of Joy That Lasts.”  It’s funny, whenever I’m feeling low or down on life, like clockwork something always crosses my path that forces me to reevaluate what’s fueling my mood. Wednesday was one of those days. Nothing was particularly wrong, I was just feeling kind of meh on life.  Does that ever happen to you?

Then, per usual, while reading one of my favorite blogs, I was directed to this article by Martha Beck in the latest Oprah Magazine. Martha talks about how our culture has come to define happiness as an experience that completely blows our mind. And that if we aren’t experiencing something like that, we’re not only not experiencing happiness, but beyond that, we’re somehow falling short. All I could think was “Well… yeah!” when I read that. I feel like I’m falling short every day, which is why I can’t be happy… right? But she goes on to explain that true happiness, not excitement, is something much different. True joy is something much more peaceful.

At this point I had a feeling where the article was going. I was ready for Martha to tell me I needed to breathe, be still, focus on the little things, and maybe do some yoga. Not the case. While she acknowledges the value of the “be still” mentality, instead, she urges one to create. To make something. Research shows we’re most happy and relaxed when we’re creating something, and simultaneously we’re most creative when our mind is in this state. This doesn’t mean I can start cooking a new dish and my mood will do a complete 180. It means that what I need to do is put my head down and create, whether that means pushing as hard as a I can to build my business, writing a blog post, or cooking meals that force me outside my comfort zone in the kitchen. Then, when I’m truly present in the work, I’ll stop searching so much for happiness because (ideally) I’ll be so absorbed in what I’m creating in that moment.  Obviously, I’m not able to work or create all the time, but Martha explains that the more one does this, the easier it becomes to “tune in to the delights of the present even when you’re not actively creating.”

Not so sure if this will work? Neither was I, but I have to tell you, just taking the time to analyze this article, gather my thoughts, and write this blog post made me pretty happy!  Go see for yourself. And have a wonderful weekend while you’re at it!

Photo Credit

When I was 15, my family took a trip to Greece. It is, to this day, my favorite country I’ve visited in Europe. Everything about it- the food, the countryside, the places we stayed- was amazing. I can’t believe that trip was eleven years ago and I’m still reveling in it!

Greek food has always been one of my favorite cuisines, but it really made the top of my list after that trip. Most of the restaurants we visited were complete hole in the walls. We’d arrive at a restaurant and the owners would lead us to the kitchen to show us the dishes on the stove and in the oven. Meaning, what was on the menu that day! We’d point and say which ones we wanted, and then they’d bring out a feast.

Since that trip I’m always thrilled to find small, family run Greek operations in the States. Nothing fancy, no frills, just really solid and traditional Greek food. At my old job, I was lucky enough to have one of these spots right down the street. It was called Vaso’s and I can’t tell you how many times I stuffed myself over lunch at this spot. I could not get enough of their Greek salads, dips, stuffed pita sandwiches, and fried haloumi cheese. One of the dips I enjoyed most with this spicy feta dip that was light red in color. Paired with hot pita bread, I could have eaten mountains of this stuff.

Since our move I’ve yet to discover a Greek restaurant in New York that makes this dip. I’m sure it’s out there, but in the mean time I set out to create my own version at home.  After much research, I finally found a recipe that sounded quite similar to what they served at Vaso’s. I also decided to make homemade pita bread to go with, since I’d read how simple it was to make.  Store bought pita would be just as good with this recipe, just make sure to warm up the pitas in the oven a bit before serving. The dip itself takes zero time to put together, making it perfect for a dinner party appetizer, or in our case- a snack to last us through the week!

Spicy Feta and Red Pepper Dip adapted from Cook’s Illustrated

Makes about 2 cups

  • 8 oz feta cheese
  • 1 6 oz jar roasted red peppers, drained and patted dry
  • juice of half a lemon
  • 1/2 tsp red pepper flakes
  • 1/4 cup of olive oil

Blend all ingredients together in a food processor until mostly smooth. Pour dip into a dish and refrigerate for an hour before serving. Top with a drizzle of olive oil and sprinkle of cayenne pepper and parsley (if desired) before serving.

Homemade Whole Wheat Pita Bread 

For the pita bread, I followed Gourmet’s recipe exactly.  It’s not a difficult bread recipe, but after making it myself I have a few tips that will hopefully provide a smoother experience for you!

  • Be sure to use fresh bread flour.  This makes a difference in the lightness of the dough and bread.
  • This dough requires a lot of “warm spots” to rise. It used my oven a lot for this since it’s the dead of winter and there aren’t many warm spots in my apartment, even with the heat on! I would turn my own to around 100 degrees, let it warm up a bit, put the bowl inside, and then turn the oven off. Just make sure the oven only feels slightly warm, not hot enough to cook anything.
  • The cooking time for the pitas is very short. In order to ensure your dough cooks properly during this period, it needs to be very thin. Be sure it’s rolled out well before you put it in the oven.

It’s clear I like to cook. I mean, I have a food blog and all. But sometimes guys, I really don’t want to cook. I mean, really. This doesn’t necessarily mean I want to go out to eat or get take out.  This usually means I’m craving a dinner that consists solely of bread and cheese, olives, and perhaps some cured meats.  These cravings usually hit on Fridays, after I’ve been making dinner all week and can’t bear to clean another dish. I just want to sink into the couch with a glass of wine and nosh away until I’m full.

Like clock work, this Friday afternoon I had zero energy to make dinner. Friday afternoon also happened to be the day I went grocery shopping, so I filled my cart with a handful of items that required little more than defrosting (read Trader Joe’s frozen edamame and vegetable dumplings).  I also picked up some items that did require cooking, knowing that my funk would likely pass in a day or two.

As I was walking back from the subway, I saw I had a missed call from Brandon, followed by a text message saying he had some requests for items from the store. I called and explained that I was just a few blocks from home, and started to rattle off all the food he likes and that not to worry- I had actually picked them up. He stopped me halfway and said that was nice and all, but he had plans to cook and needed chicken. He was making Chicken Tikka Masala for dinner. This news was music to my ears. The only thing better than my cheese plate dinner is having someone else cook for me. And Indian food? Something I hardly ever cook myself?  Yes, please! Luckily I had included chicken breast in our groceries for the week, so his dinner plans were good to go.

If cooking Indian food at home seems daunting, I urge you, start with something like Chicken Tikka Masala. There are a number of ingredients and spices, but it’s really simple to prepare you’ll those spices time and again for every Indian style dish you prepare.  This recipe makes a ton of food, perfect for a dinner party and having lots of leftovers.  It can also be made a day ahead, making it even more perfect for a dinner party.  See the recipe for instructions on how to prepare it that way.  Enjoy!

Chicken Tikka Masala adapted from All Recipes
Serves 6

For the chicken marinade:

  • 1 cup greek yogurt
  • 1 tablespoon lemon juice
  • 2 teaspoons cumin
  • 1 teaspoon cinnamon
  • 2 teaspoons cayenne pepper
  • 2 teaspoons freshly ground black pepper
  • 1 tablespoon minced fresh ginger
  • 1/2 teaspoon salt
  • 2 boneless skinless chicken breasts, cut into bite size pieces (about 1 lb)
  • 4 drumsticks, skin removed (about 3/4 lb, or can sub out with 2 more chicken breasts)

For the sauce:

  • 3 tablespoon butter
  • 2 cloves garlic, minced
  • 2 teaspoons ground cumin
  • 1 tsp cayenne
  • 2 teaspoons paprika
  • 1 teaspoon salt
  • 1 (15 ounce) can tomato sauce
  • 3/4 cup heavy cream
  • 1/4 cup chopped fresh cilantro

In a large bowl, combine all the ingredients for the chicken marinade.  Stir in chicken, cover with saran wrap, and let marinate in the fridge for 2 hours.

During the last half hour of marinating, prepare the sauce. Melt butter in a heavy bottomed pot over medium low heat. Add in the garlic and sauté for 1 minute. Add in all spices, stirring to combine, followed by the tomato sauce and heavy cream. Stir to combine. Simmer over low heat for roughly 20 minutes until sauce has thickened.

Preheat your oven to broil. Place your top rack in the highest position. Cover a large rimmed baking sheet with foil. Once done marinating, place the chicken on the baking sheet. Place under the broiler and cook for 5 minutes. Remove pan from oven, flip chicken and cook for an additional five minutes. Remove chicken from pan* and place in sauce. Simmer for an additional ten minutes. Serve chicken over basmati rice and top with chopped cilantro.**

*Please note- if you’re cooking drumsticks, they’ll need a bit more (3-5 minutes) to cook. You can also do without the drum sticks and use 4 chicken breasts (about 2 lbs total of chicken).  We plan on doing just chicken breasts the next time, but either way is delicious!

** If you’re making the dish ahead, cook the chicken and prepare the sauce the day before, and store separately.  Once ready to serve, heat the sauce in a large pan over medium low heat. Once heated stir in the chicken and simmer for 15 minutes until chicken is heated through.